|
Plants to Grow
Radishes and Turnips
Carrots and Celery
Ginger root (rhizome) and Sunchokes (Jerusalem artichokes)
Potatoes and Sweet Potatoes
Seeds of citrus, avocado, and Medjool Date Palm
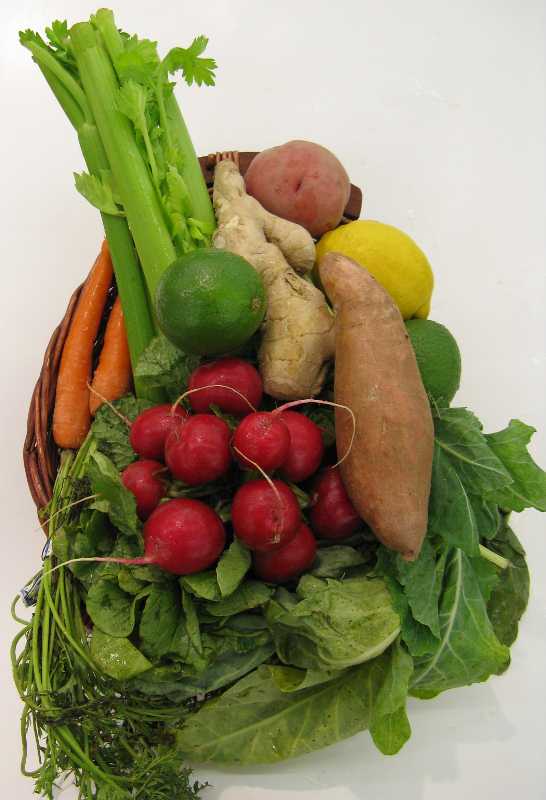
Supplies: Quality potting mixture for indoor plants; 1 ¾ pint pots with drain holes are a good starting size; clear pint glass jars with lids; small water glasses or half-pint glass jars; shallow containers about 4 ½ inches wide and 2 inches deep; paper towels; toothpicks; plastic food wrap film; house plant fertilizer; emery board or sandpaper; sharp kitchen knife (an adult should do all required cutting).
Depending on your choices, nothing more than a good potting mixture and a pot may be needed. Specific needs are addressed with each plant piece, root, tuber, or seed.
|

Radish
Radish
Turnip
Turnip |
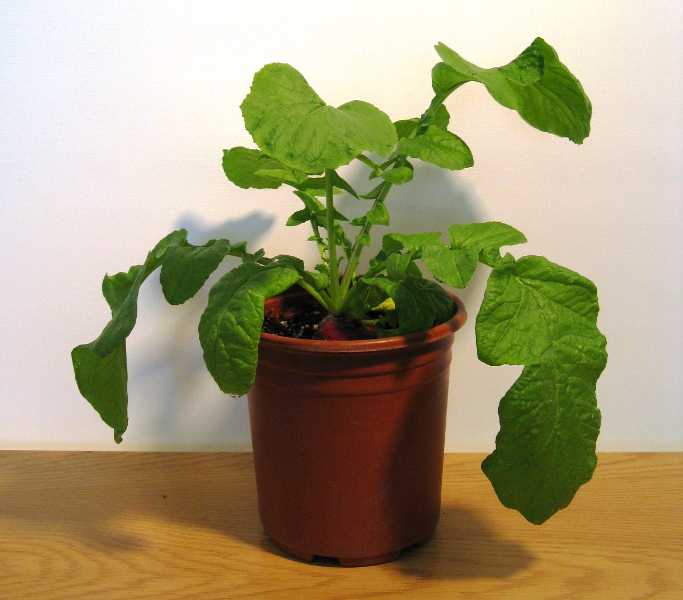
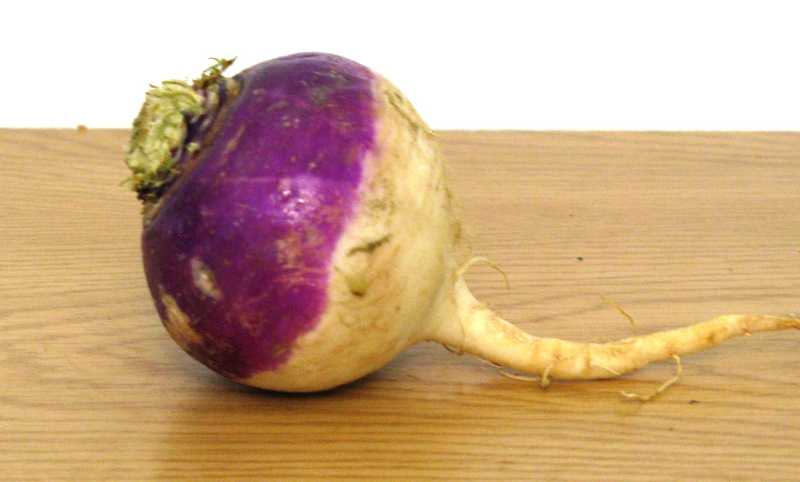
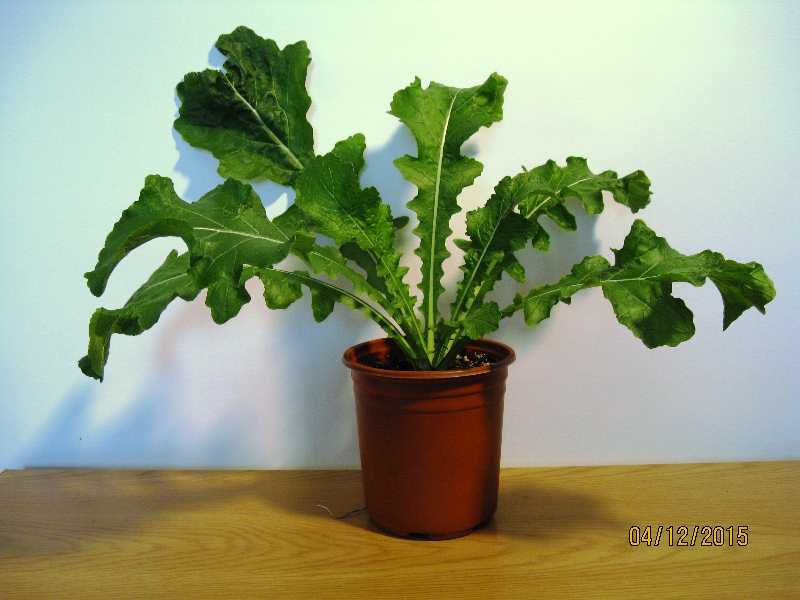
Whole Turnips and Radishes
These choices provide quick results. Think of them as starter experiments. They develop fast and look great while you and your child pursue some of the slower growing choices. The entire root is used. Select only firm fresh roots. Given a choice, pick ones that have the most intact 'tails' coming from the bottom of the root. Radishes are about golf ball size. If using radishes very much smaller than that, consider placing 2 or 3 together in the same pot for a fuller growth. Turnips don't need to be huge. Use only one per pot.
These taproot vegetables may be sold with or without green tops attached. If greens are attached, cut them off leaving about a ¾ inch stub. Use a 1¾ pint pot and a good quality potting mixture for indoor plants; moistened lightly. Plant the root deep enough that just the very top is visible. Keep well-watered but not sitting in water. Place the pot in a bright window and watch for new growth. Plants should be able to take full summer window sun once established. As the growth develops, low strength house plant fertilizer may be used.
What to Expect: Both can be maintained as house plants for months. Radishes grown quickly and produce tidy attractive small green plants with frilly-edged leaves. Turnips sprout quickly and produce bright green over-sized irregular bordered and incised leaves. 'Boisterous' best describes their growth habit. Under good conditions, they might bloom.
|
|
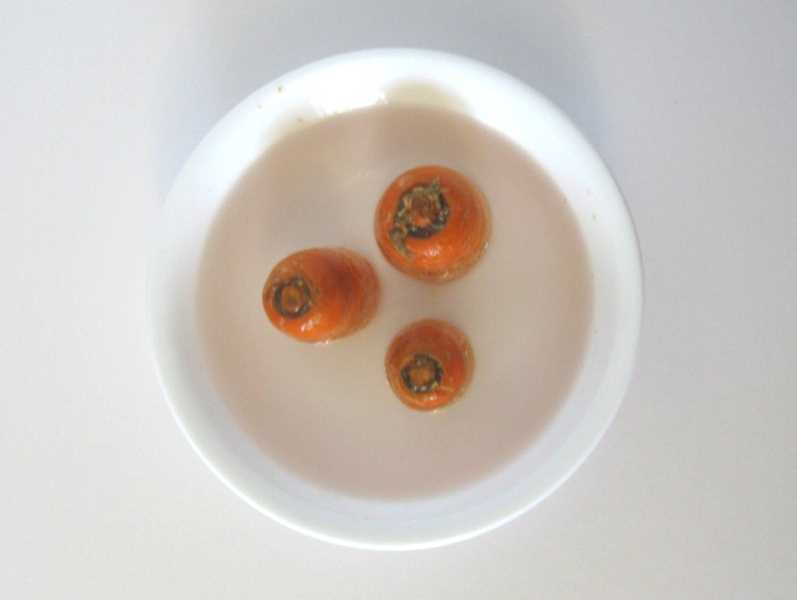
Carrot
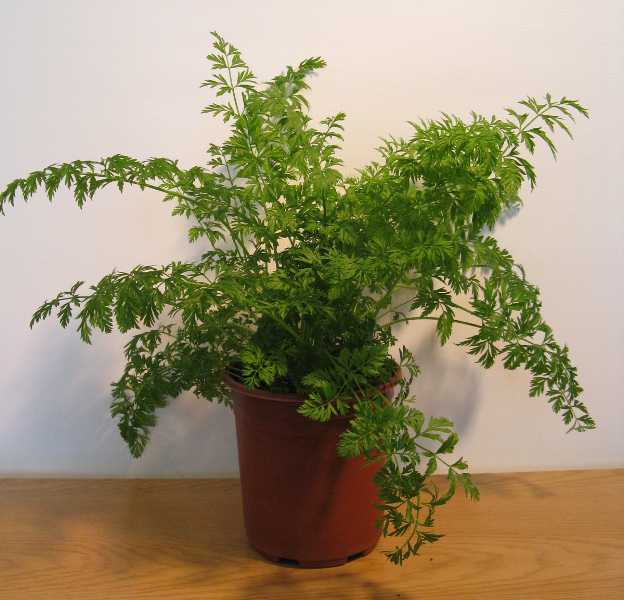
Carrot
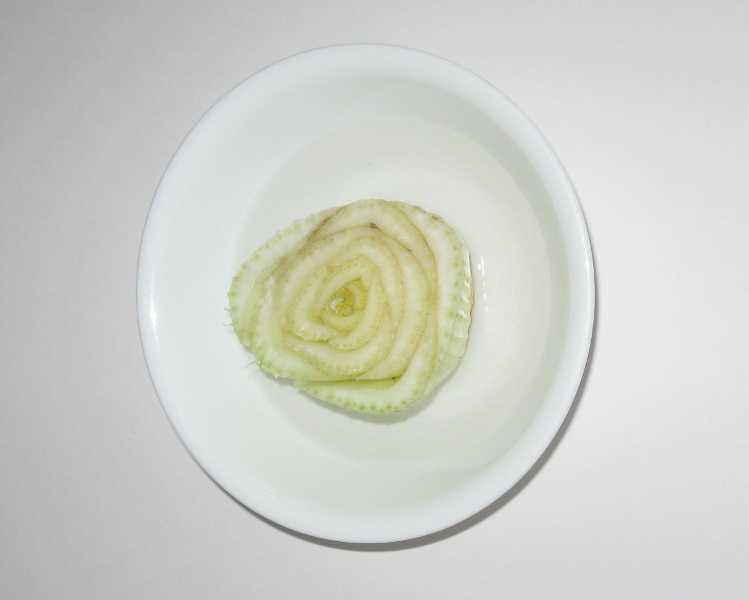
Celery
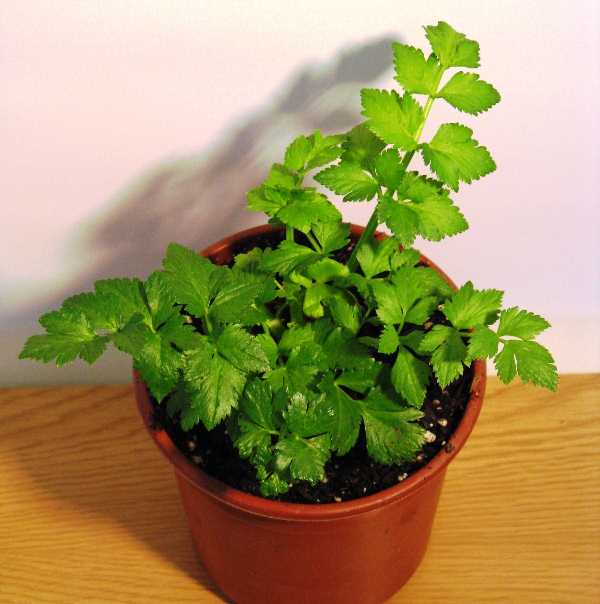
Celery
|
Carrot Tops and Celery Stalk Bottoms
Great house plants can be grown from just the tops of carrots and the discarded bottom of a celery bunch.
Carrot Tops:
Cut 1½ inches off the tops of 2 or 3 carrots. Use firm fresh carrots. Soft carrots will likely rot before they root. If they come with greens, cut off the greens, leaving about a ¾ inch stub. Place carrot top pieces upright on their cut ends in a shallow bowl and maintain 1 inch of water in the bowl at all times. Change water as necessary to maintain freshness. The carrot will send out roots from the sides and greens will sprout from the top. Once roots are established, plant the carrot pieces in a 1¾ pint pot, using a moistened potting mixture. The carrot top should be just below the top surface of the soil. Place the pot in a sunny window and keep it well-watered but not sitting in water. Carrot plants will wilt if too dry, but recover quickly when watered. Once established, low strength indoor fertilizer may be used. Whole carrots also may be used; treat them as suggested with radishes and turnips.
Celery Stalk Bottoms
The usually discarded bottom of a celery bunch can grow new celery greens. When most of the stalks are used, cut any remaining stalks, leaving a stalk stub of about 1½ inches. Place the celery stalk bottom in a shallow bowl and maintain 1 inch of water at all times. Change water as necessary to maintain freshness. Celery bottoms and carrot tops can be in the same bowl. Roots will soon appear from the celery stalk bottom and new celery growth will sprout from the top. Once sufficient roots are established, plant the celery bottom in a 1¾ pint pot using a moistened potting mixture. The bottom of the celery stalks should be just below the soil surface. Place the pot in a sunny window, keep well-watered but not sitting in water. Once established, low strength indoor plant fertilizer may be used.
What to Expect: Carrots and celery produce attractive potted plants and can be maintained inside or outside in pots for a long time. Carrot plants are quite frilly and somewhat resemble ferns. While both can be replanted outside, the carrot will not produce a new carrot root for eating. Very rarely, the celery might produce a new edible celery bunch in the garden.
|
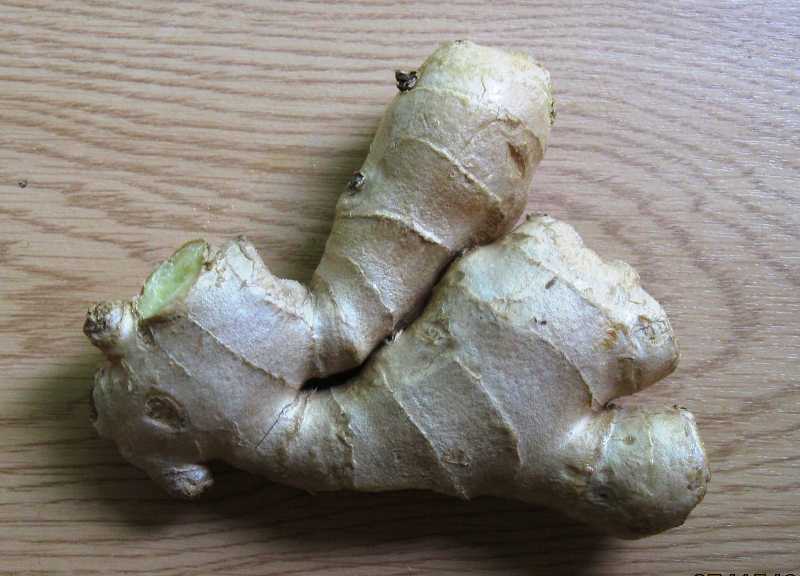
Ginger root
Ginger
|
Ginger Roots and Sunchokes
Fresh ginger roots (rhizome) and sunchokes are easy to grow. Instructions are the same for both. Cut off a 3 inch piece of the rhizome, making sure the other end has not been cut and has several healthy-looking well-developed growth buds. That uncut end will be where new growth will start. Let the cut dry out overnight before planting. A 1¾ pint pot for each will do initially, but both plants will eventually need larger pots. Cover the rhizome piece with 1 inch of potting medium and place in a bright window. Water lightly until sprouts are visible. Keep well-watered but not sitting in water. Once you see growth, both will grow rapidly. Fertilizer may be used if you choose.
Ginger
What to Expect: As ginger grows, it will send out rhizome extensions that will produce additional sprouts. With care, time, and a much bigger pot, that ginger planting may keep your family in ginger root indefinitely. Easy to care for as a potted plant, it will thrive outside in a shady spot during the warm months, but must be brought in before the temperature dips below 50°F, and must not be put outside again in the spring until the temperature will be staying above 50°. The mature plant is usually about 3 feet tall and has attractive blooms.
|
|
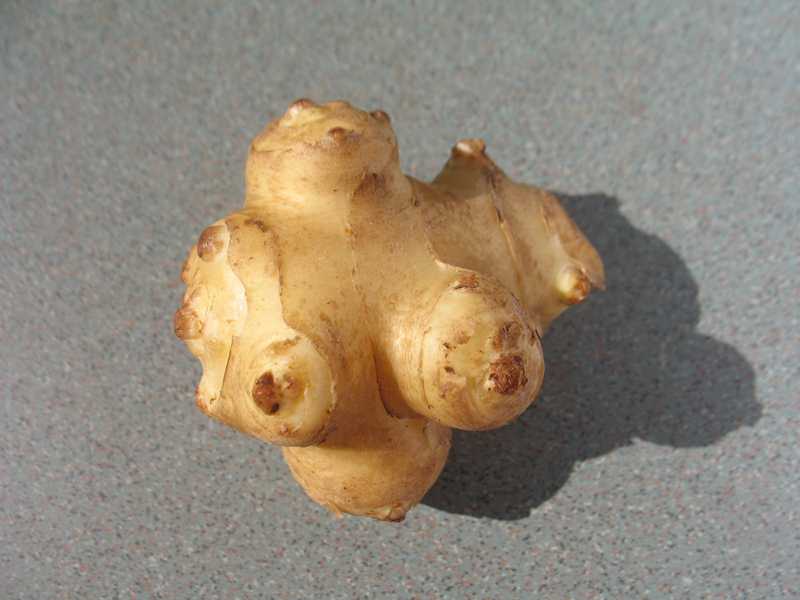
Sunchoke root
Sunchoke
|
Sunchokes
What to Expect: Also called Jerusalem artichoke (it’s not an artichoke), it’s actually a native perennial sunflower. The tubers were cultivated and eaten by Native Americans. Outdoors, the tops die back in the fall and sprout again from the underground tubers the next spring. A tuber started in a 1¾ pint pot will soon need a larger container. In a bigger pot, it will rapidly develop into a large, vigorous, short term house plant. They are able to thrive and survive our winters when planted outside. However, they are very aggressive and will spread rapidly. Think carefully before planting them outside.
|
Potato
Potato
Potato |
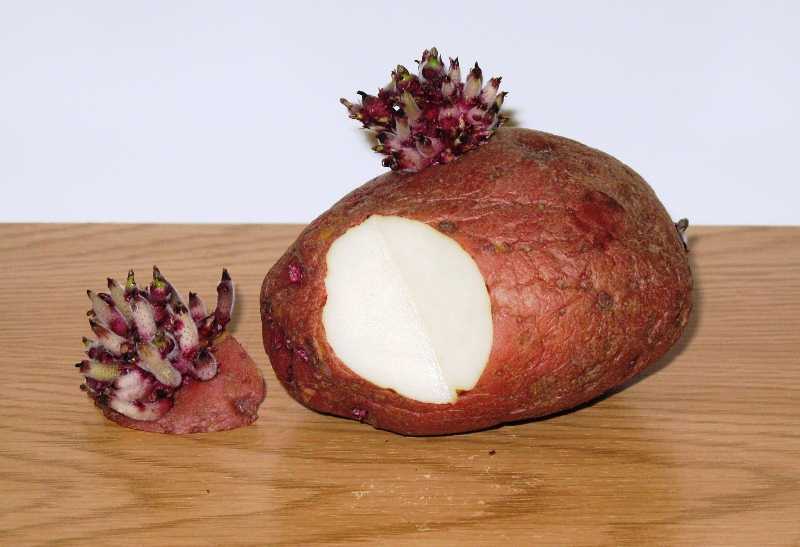
Potatoes
Your pantry may have already done most of the work for you. Check for that potato that got pushed to the back of the shelf last month. While most potatoes from the grocer have been treated to discourage sprouts, it doesn’t always work. If you find a sprouting potato, cut out that ‘eye’ containing the sprout, taking about a one inch wedge of potato with it. Let it dry for one or two days. Plant it in a 1¾ pint or larger pot with the potato wedge and potato skin fully below the soil surface and the top of the sprout showing. Water well and give lots of bright light. If you can’t find a sprouting potato, treat it like a sweet potato below, but don’t worry about which end is up.
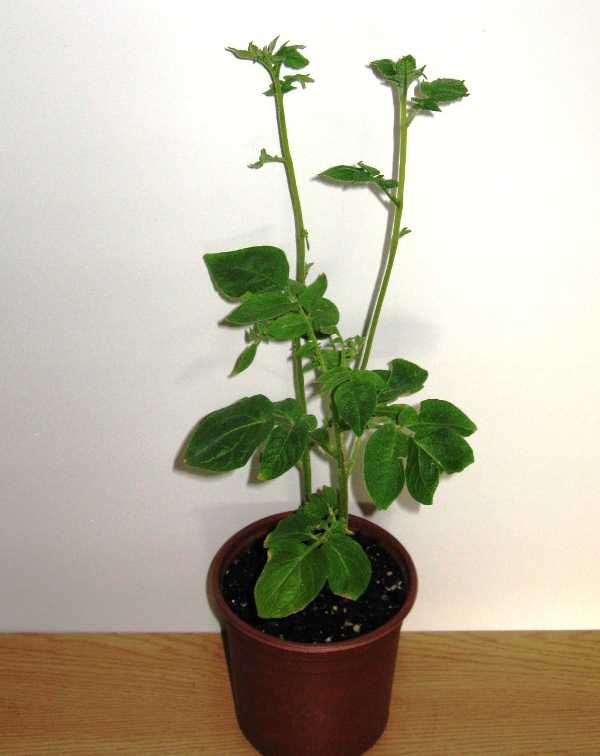
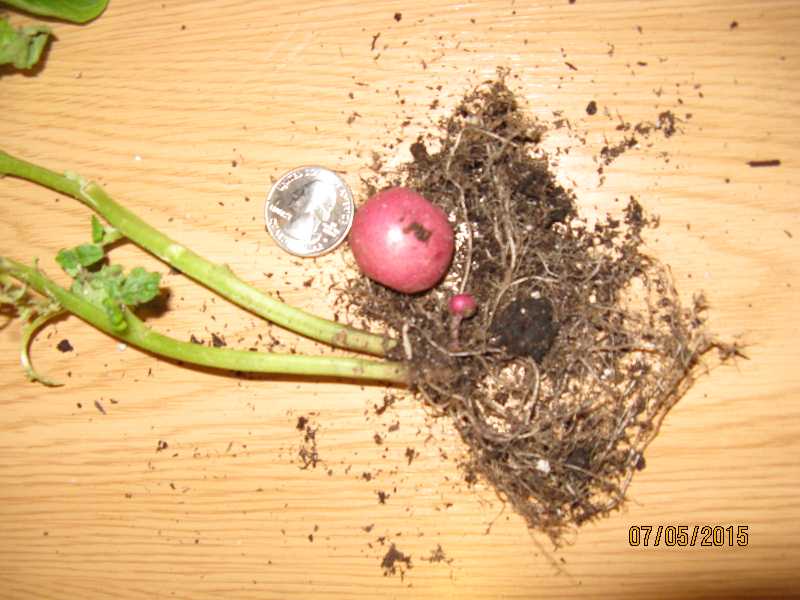
What to Expect: The potato plant will not win any beauty awards, but it will live for a long time. If you keep it long enough, even in a pot, you might get a surprise when you decide to take it out of the pot. In addition to the quarter sized potato pictured, also note the tiny pea sized potato next to it.
Note: Potato foliage is toxic and should not be eaten.
|
Sweet potato
Sweet potato
Sweet potato |
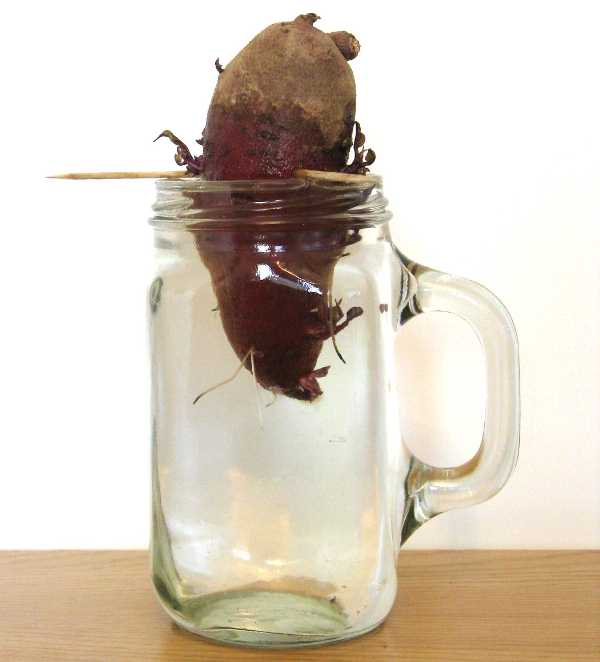
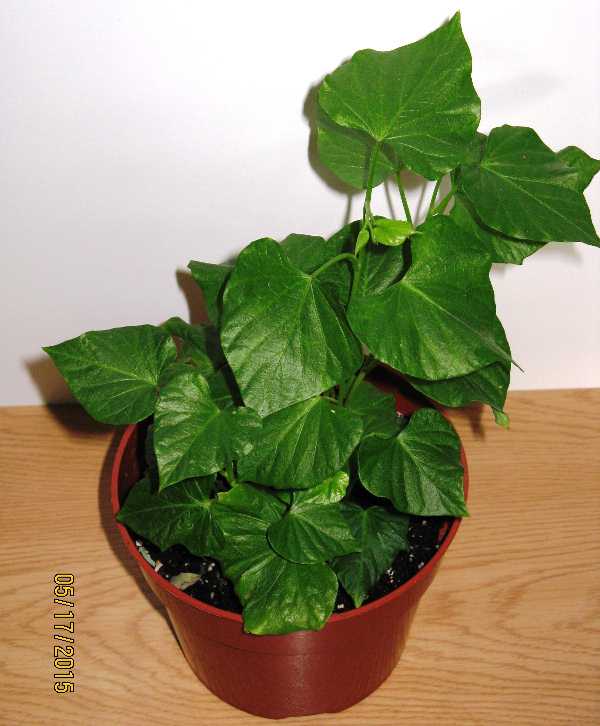
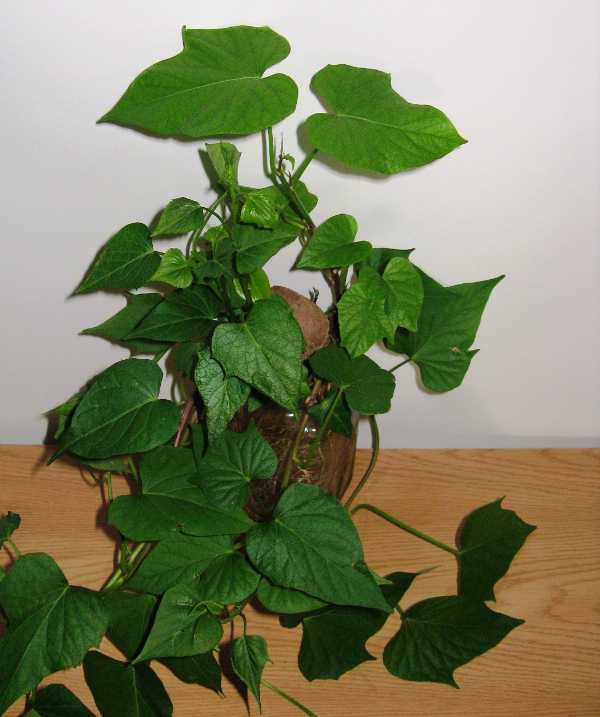
Sweet Potatoes
Most sweet potatoes from the grocer are treated to discourage sprouting. However, with the help of a pint jar of water and toothpicks, time will usually solve that problem. Gently wash the sweet potato in clear water. Firmly insert 3 toothpicks equidistant around the center of a sweet potato; place the bottom of the sweet potato down into the water (only the bottom of the sweet potato will have the remains of a stem) with the toothpicks resting on the edge of the jar. Keep the water level at the top of the jar and place in a bright window. Over time, sprouts and roots will develop. Cut off one or more sprout/root combinations and plant in a 1¾ pint or larger pot. Water well and give lots of bright light. Keep well-watered but not sitting in water. Indoor plant fertilizer may be used.
What to Expect: Sweet potatoes make excellent house plants. Their foliage is dark green and attractive. They may be kept tidy by pruning or let go as vines that can get huge. If you don’t choose to plant them in soil, they can be maintained for long periods of time simply growing in water. Also, additional pieces can be rooted in water. Planted in a garden in the summer, they may produce one or more tubers (and try to take over the garden).
|
|
Key lime

Seeds
Key lime
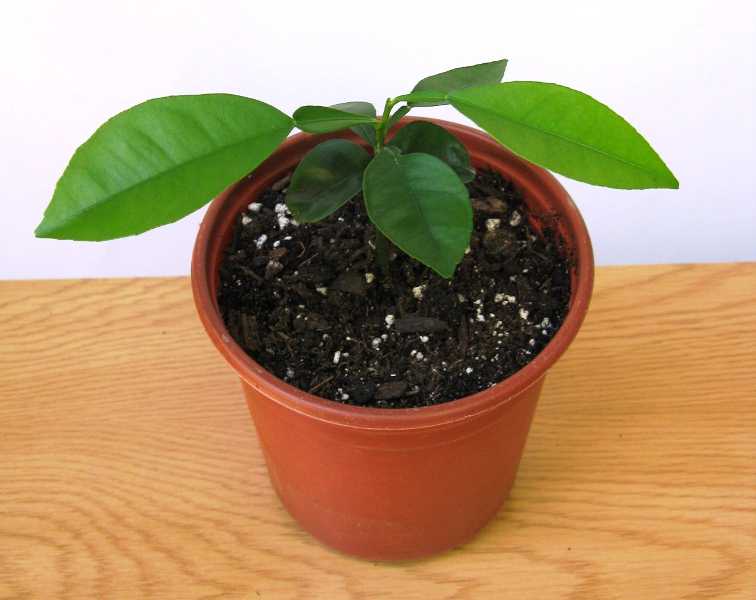
Key lime
|
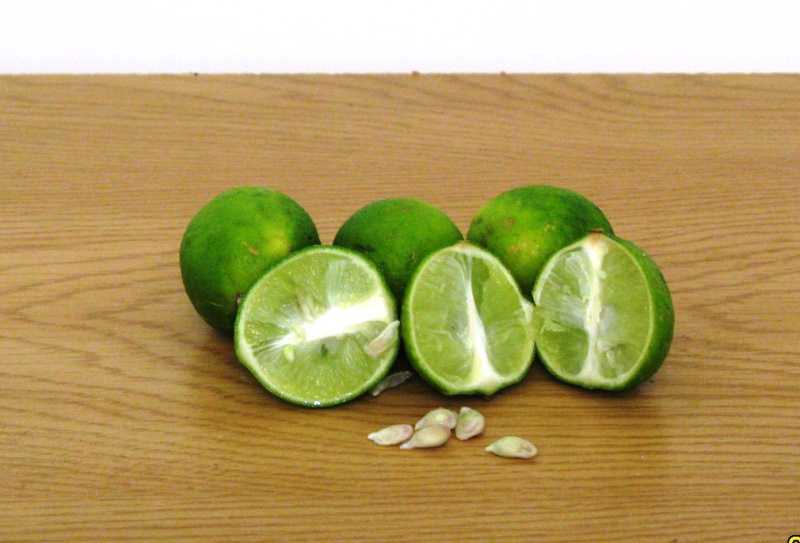
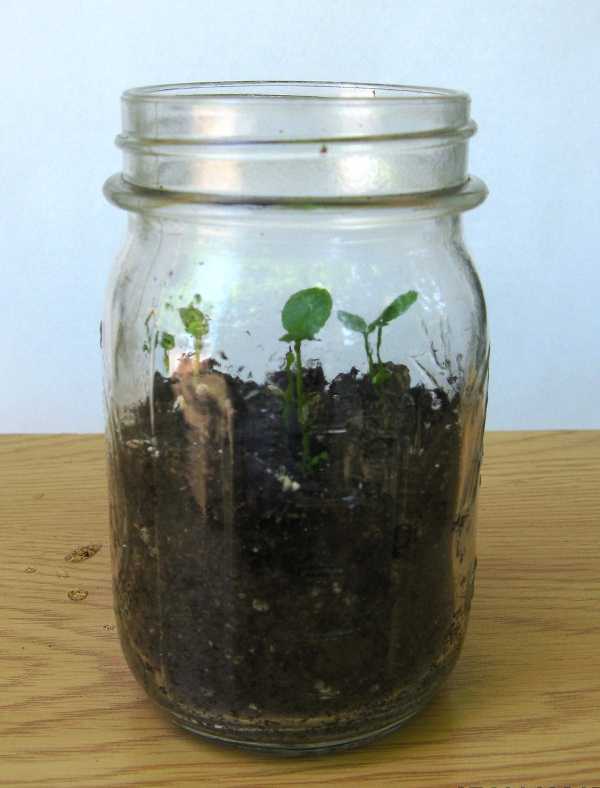
Citrus Seeds
Most citrus fruits have seeds, and most seeds you find in citrus fruits should sprout successfully. If your goal is to have a smaller house plant that might eventually bloom and bear fruit, try key lime seeds. There are other small citrus species that make good house plants and might bear fruit, but they’re unlikely to be found at your grocer. Citrus seeds will not germinate unless planted immediately upon removal from the fruit. Clean the slime off the seed surface with fresh water and plant them right away. Have ready a clear pint jar filled with 1 cup of slightly moist potting medium and plant several seeds about ½ inch deep. Place a lid or plastic film on the jar to maintain moisture. Place the jar in good light, but avoid direct sunlight: heat buildup in a covered jar will kill the seeds. Seeds may sprout in as little as 2 weeks. Remove the lid when several seedlings are up. Sprinkle small amounts of water on the soil surface as it appears dry, but add sparingly. No water should pool in the bottom of the jar. Once the jar is uncovered, stronger light may be provided.
Allow the first pair of new leaves to grow a bit before transplanting. Check the bottom of the jar for evidence of root development. Don’t be in a rush to transplant. When you transplant, use a pot no larger than 1¾ pints and be sure all roots are covered. Avoid direct sunlight for the first week or so, then place the pot in a sunny window. Keep it well-watered but not sitting in water. Once established, indoor plant fertilizer may be used.
What to Expect: Citrus plants are attractive, long lived easy care house plants. They do need consistent and regular watering, good soil drainage, and should not be allowed to ‘sit” in water. They will thrive outside during the warm months. In the fall bring them in before the temperature dips below 50°F. They may be returned outside again in the spring once the temperature will be staying above 50°. Indoors in the winter, they do well in front of a bright sunny southern window or glass door. Their size will depend on the variety and how much pruning you do. If they bloom for you in the winter, the flowers will perfume the whole house.
|
|
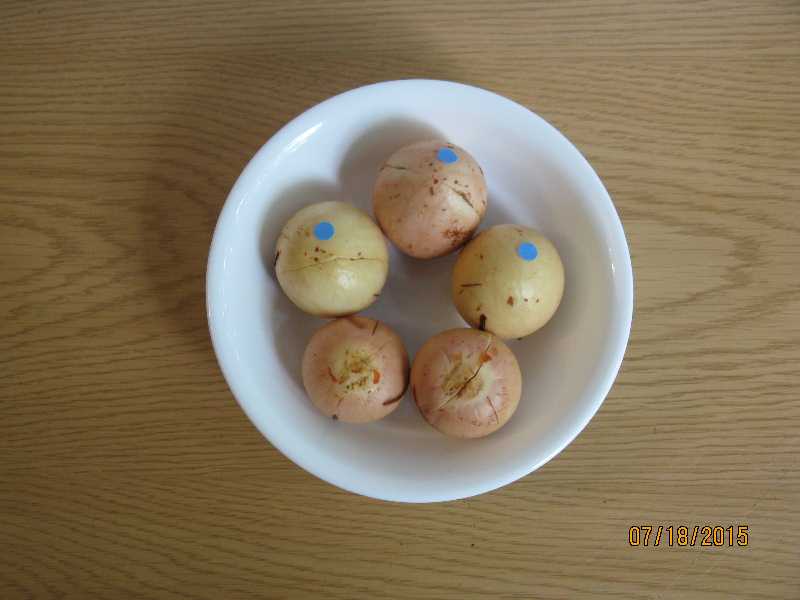
Avocado seeds (blue dot = top)

Avocado seed
Avocado seed
Avocado
|
Avocado
The first step is to clean the seeds and remove most of the seed coat. A knife may be needed to peel off the seed coat, and that job is for the grownup. Avocado seeds should be planted with the top of the seed up. Some avocado seeds have a distinct pointed top. These pose no problems in deciding which is top and which is bottom. Other avocado seeds are shaped like golf balls and it’s not so easy to tell. If both pointed and round avocado seeds are placed together, with the papery seed coats removed, pick up the one with the distinctly pointed top and look at that bottom. On that bottom, there should be a small circle of slightly different color than the rest of the avocado, with one or two pin-point size projections within that circle. That is the bottom of the seed. Find those same features on the ‘golf ball’ avocado and you have found the bottom of that seed. There are two ways to sprout avocado seeds:
Avocado Seed in a Potting Mixture: Fill a clear pint jar with 1 cup of slightly moist potting medium. Press the prepared avocado seed about half way into the planting medium. Put a lid or plastic film on the jar to retain moisture. Place the jar in good light, but avoid strong direct summer sunlight. Direct summer sun can cook the jar’s contents. When there is both root and vertical sprout visible, plant the seed in a 1¾ pint pot with about ½ to ¾ of an inch of the avocado above the soil level. Place the pot in a sunny window, keep it well watered but not sitting in water. Once established, low strength indoor plant fertilizer may be used.
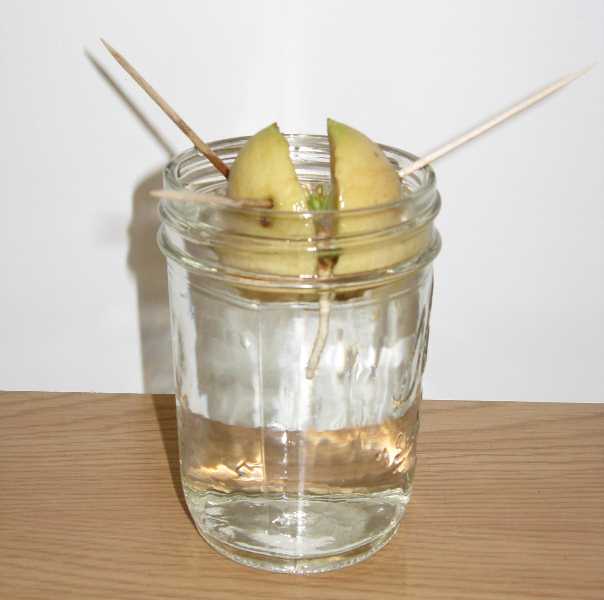
Avocado Seed in Water: Use a small glass of water and three toothpicks. With the top of the seed pointed up, firmly insert the three toothpicks into the top third of the avocado, spacing them equidistant around the avocado and pointing slightly downward toward the center of the seed. Place the avocado seed in the glass or jar with the toothpicks resting on the jar edge. Maintain the water level at a little more than half way up the side of the avocado. The proper water level should be maintained or the eventual new root might be damaged. When there is both a root and a vertical sprout, remove the toothpicks and plant it in a 1¾ pint pot of moistened planting medium with about ½ to ¾ of an inch of the avocado seed showing above the soil line. Place the pot in a sunny window: keep it well watered but not sitting in water. Once established, low strength indoor plant fertilizer may be used.
What to Expect: Avocado plants are attractive, large-leafed easy care house plants. They will thrive outside during the warm months. In the fall bring them in before the temperature dips below 50°F. They may be returned outside again in the spring once the temperature will be staying above 50°. Indoors, they do well in front of a bright sunny southern window or glass door. Their size and growth rate will depend on pot size and overall growing conditions.
|
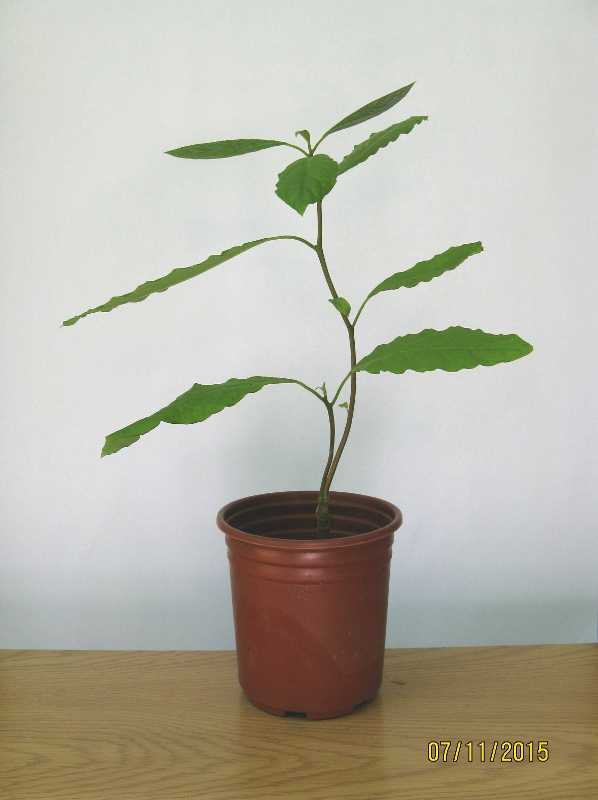
Palm date seeds
Germinating palm date seed
Palm date |
Medjool Date Palm Seeds
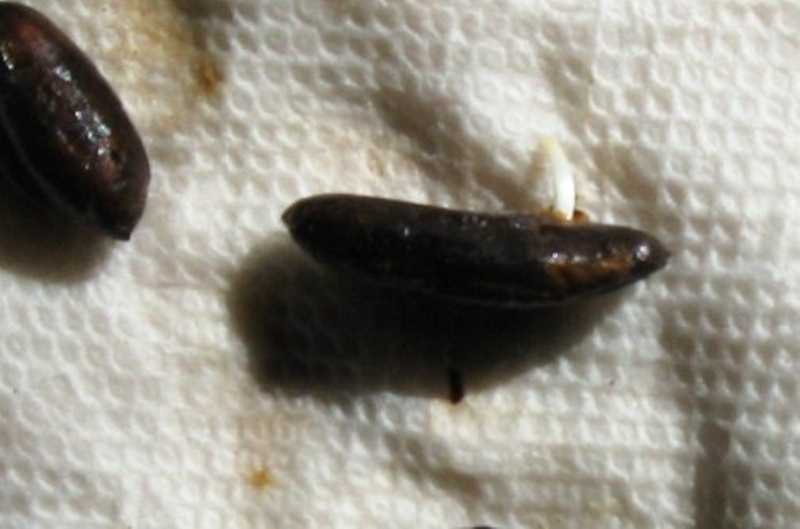
Some dates may have been heat treated and will not germinate. Check the package label. Date palm seeds need careful scrubbing to remove imbedded fruit pulp from the seed’s various crevices. An old (clean) toothbrush can be used. Palm seeds germinate faster if the brown protective coat is breached. Use an emery board or sandpaper on the flat side of the palm seed to reveal just a spot of the white seed underneath.
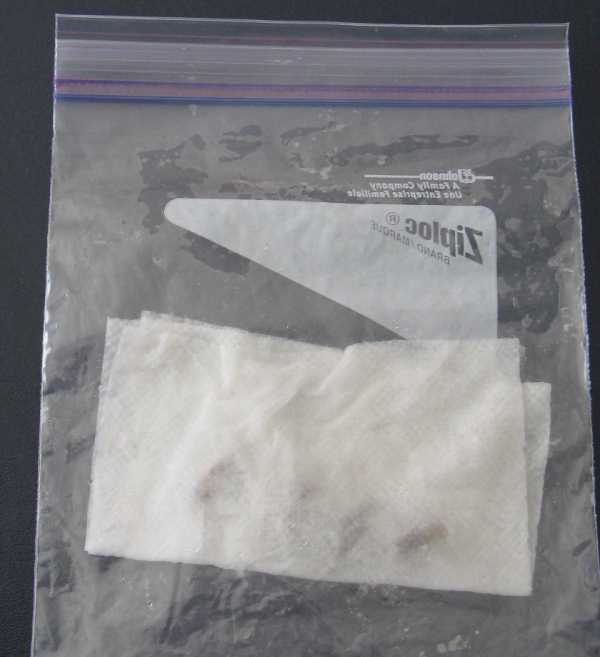
Paper Towel Method: U se a damp paper towel, folded over once, and a one quart zip-top plastic bag. Line up several well cleaned seeds in the middle of the folded paper towel. Fold that towel over again, retaining the seeds within that second fold. Place the folded towel in the plastic bag and zip it. Place the bag in a warm bright spot. Bright light can be useful, but direct summer noon and afternoon sun can kill the seeds. This bag method permits regular checking of the seeds. Mold may be gently removed from the seeds if necessary.
Date seeds produce their root from the middle of the seed. Once the date seed root is ½ to ¾ inch long, plant it in a 1¾ pint pot, using a moistened potting mixture. Plant the seed about ¾ inch deep with the root pointing down. Cover the top of the pot with plastic food wrap to maintain soil moisture. This step may take some time, so be patient. Remove the plastic wrap as soon as you see the green sprout above the soil. Direct sun on that plastic covering can ‘cook’ the new sprout. Keep the pot in a sunny window, well-watered but not sitting in water. Once established, low strength indoor plant fertilizer may be used.
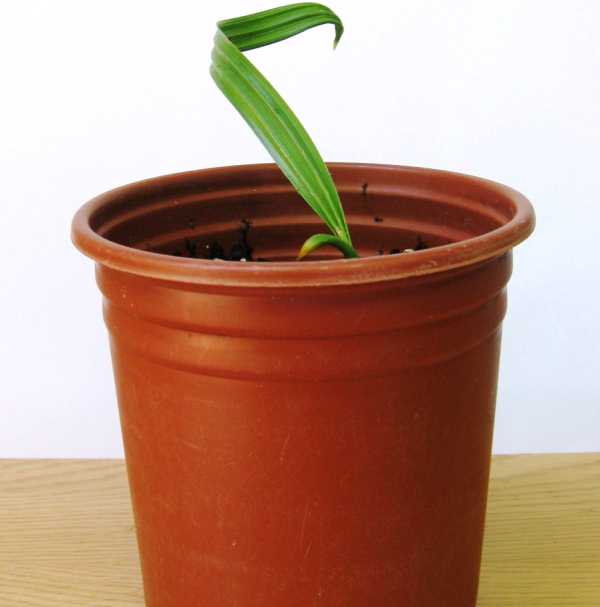
What to Expect: The new sprout will grow slowly, so don’t expect it to look like a palm tree very soon. Over time, it will become a unique and attractive plant that can live for years. Date palms will thrive outside during the warm months. In the fall bring them in before the temperature dips below 50°F. In the spring, put them outside when the temperature will be staying above 50°.
Don’t expect to see fruits. Medjool date palms, like many plants, are either male or female, and whichever you have, it takes one of each to produce fruit.
|